GAMES101作业笔记02
1 判断点是否在三角形之内
前两个坐标是像素点的坐标,第三个参数是个const Vector3f类型的指针,实际上传进来的是以Vector3f数组类型保存的三角形的三个顶点1
2
3
4
5
6
7
8
9
10
11
12
13static bool insideTriangle(float x, float y, const Vector3f* _v)
{
// TODO : Implement this function to check if the point (x, y) is inside the triangle represented by _v[0], _v[1], _v[2]
Vector3f point(x, y, 0);
Vector3f e0 = _v[1] - _v[0]; // vector _v[0] to _v[1]
Vector3f e1 = _v[2] - _v[1];
Vector3f e2 = _v[0] - _v[2];
Vector3f p0 = point - _v[0]; // vector _v[0] to point
Vector3f p1 = point - _v[1];
Vector3f p2 = point - _v[2];
return e0.cross(p0).z() > 0 && e1.cross(p1).z() > 0 && e2.cross(p2).z() > 00;
}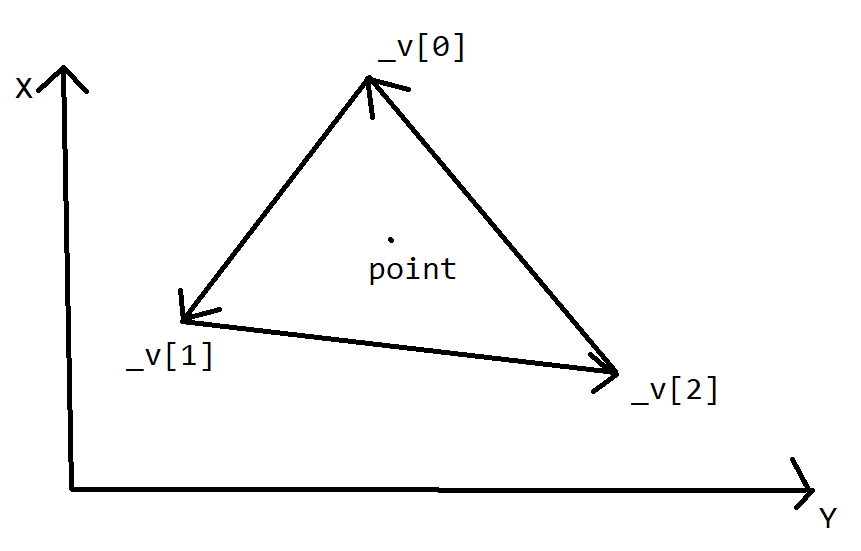
看这张图就懂了,将每条向量算出来以后,叉乘一下判断顶点和point组成的向量都在边的左边就行了
2 三角形栅格化算法及Z-Buffering算法
老规矩,先上代码再讲解1
2
3
4
5
6
7
8
9
10
11
12
13
14
15
16
17
18
19
20
21
22
23
24
25
26
27
28
29
30
31
32
33
34
35
36
37
38//Screen space rasterization
void rst::rasterizer::rasterize_triangle(const Triangle& t) {
auto v = t.toVector4();
// TODO : Find out the bounding box of current triangle.
float min_x = width;
float max_x = 0;
float min_y = height;
float max_y = 0;
for (const auto& vi : v) {
min_x = std::min(min_x, vi.x());
max_x = std::max(max_x, vi.x());
min_y = std::min(min_y, vi.y());
max_y = std::max(max_y, vi.y());
}
// iterate through the pixel and find if the current pixel is inside the triangle
for (int x = min_x; x <= max_x; x++) {
for (int y = min_y; y <= max_y; y++) {
// If so, use the following code to get the interpolated z value.
if (insideTriangle(x + 0.5, y + 0.5, t.v)) {
auto [alpha, beta, gamma] = computeBarycentric2D(x + 0.5, y + 0.5, t.v);
float w_reciprocal = 1.0 / (alpha / v[0].w() + beta / v[1].w() + gamma / v[2].w());
float z_interpolated = alpha * v[0].z() / v[0].w() + beta * v[1].z() / v[1].w() + gamma * v[2].z() / v[2].w();
z_interpolated *= w_reciprocal; // 得到当前像素的深度值
// z-buffering algorithm
if (z_interpolated < depth_buf[get_index(x, y)]) {
// TODO : set the current pixel (use the set_pixel function)
// to the color of the triangle (use getColor function)
// if it should be painted.
Vector3f point(x, y, z_interpolated);
set_pixel(point, t.getColor());
depth_buf[get_index(x, y)] = z_interpolated;
}
}
}
}
}
这个栅格化三角形算法的过程,我们先求出三角形的bounding box,这个其实就是取所有需要渲染的三角形的左下角和右上角围成的矩形看,这样可以使得我们光栅化时无需遍历每一个像素点,也是一种优化
接着我们遍历这个bounding box,根据我们前面学到的,像素点中心是坐标+0.5。如果在三角形内,我们根据作业框架提供的代码求出这个像素的插值深度值
接着就可以使用Z-Buffering算法更新depth_buf缓存区和frame_buf缓存区的值和颜色了 PS:此处求index需要调用get_index
此时,我们基础的工作就已经完成了,这个时候可能发现,三角形都是倒着的,这是因为我们推导的时候使用的是右手坐标系,而写代码使用的是左手坐标系,解决办法
3 MSAA实现(有黑边版)
1 | // store centers of four smaller pixel MSAA 4X |
首先我们使用了一个std::vector<std::pair<int, int>>存储小像素块的中心,将一个像素块分割为2 * 2的像素块,然后依次计算一个像素里面有多少个小像素在三角形里面。即得到我们的count,最后将颜色平均,乘上一个count / 4即可
最终MSAA 4X效果:(右图)
可以看到锯齿的效果明显减弱,效果还是很好的,可是我们可以发现有黑边,这个还需还需继续处理
4 黑边的出现原因和解决办法

这幅图很显而易见能看到原因,在我们绿色三角形和蓝色三角形的交叉处,有三个小像素在绿色三角形内,一个小像素在蓝色三角形内,这时我们更新depth_buf和frame_buf(3/4),但是因为蓝色三角形在绿色的下面,所以此时是无法更新蓝色的。
把这种情况反过来,当绿色小方块只占1/4时,此时将frame_buf更新为color * 1/4之后,蓝色因为在下面所以还是无法更新,模糊操作其实就是像素点内个点加权后的平均值,所以我们在做模糊操作时不能只考虑单个三角形内子采样点的颜色,还要考虑三角形外的颜色。
解决办法不能只是单纯清除depth_buf的内容,而是去维护一个新的depth_buf和frame_buf,将子采样点的深度和颜色都记录下来,将图片看成4倍大小处理。
首先,在rasterizer.hpp中添加以下的成员变量和成员函数(其实就是额外维护的缓冲区)1
2
3
4
5
6
7
8
9
10
11std::vector<Eigen::Vector3f> super_frame_buf; // MSAA frame_buf
std::vector<float> super_depth_buf; // MSAA depth buf
int get_super_index(int x, int y, int k);
Eigen::Vector3f get_super_color(int x, int y);
// 可选,为了方便代码容易看加的
// MSAA height_times * width_times
constexpr static int height_times = 2;
constexpr static int width_times = 2;
int msaa_times() { return height_times * width_times; }
然后在构造函数和clear函数中都添加进我们的MSAA缓冲区1
2
3
4
5
6
7rst::rasterizer::rasterizer(int w, int h) : width(w), height(h)
{
frame_buf.resize(w * h);
depth_buf.resize(w * h);
super_frame_buf.resize(w * h * msaa_times());
super_depth_buf.resize(w * h * msaa_times());
}
1 | void rst::rasterizer::clear(rst::Buffers buff) |
接着去实现get_super_index和get_super_color的定义
get_super_index是去得到二维坐标下一位的索引,k值是指一个父采样点分成四个子采样点以后的偏移量,即k(0-3)对应各个子采样点
1 | int rst::rasterizer::get_super_index(int x, int y, int k) |
get_super_color是用于从子采样点的frame_buf中计算出父采样点的颜色
1 | Vector3f rst::rasterizer::get_super_color(int x, int y) |
最终在MSAA的栅格化算法中,没有使用count去维护有几个子采样点在三角形之内,而是使用了一个bool类型的变量去判断是否有点通过了深度测试,只要有一个子采样点通过了深度测试,那么我们就应该去更新相应父采样点的颜色1
2
3
4
5
6
7
8
9
10
11
12
13
14
15
16
17
18
19
20
21
22
23
24
25
26
27
28
29
30
31
32
33
34
35
36
37// store centers of four smaller pixel MSAA 4X
std::vector<std::pair<float, float>> centers_of_pixel{
{ 0.25, 0.25 },
{ 0.25, 0.75 },
{ 0.75, 0.25 },
{ 0.75, 0.75 }
};
for (int x = min_x; x <= max_x; x++) {
for (int y = min_y; y <= max_y; y++) {
// 此处不用count而是改为判断是否通过了深度测试,只要子采样点通过了深度测试就要更新父采样点的像素
bool depth_test = false;
for (int k = 0; k < height_times * width_times; k++) {
auto& [dx, dy] = centers_of_pixel[k];
if (!insideTriangle(x + dx, y + dy, t.v))
continue;
auto [alpha, beta, gamma] = computeBarycentric2D(x + dx, y + dy, t.v);
float w_reciprocal = 1.0 / (alpha / v[0].w() + beta / v[1].w() + gamma / v[2].w());
float z_interpolated = alpha * v[0].z() / v[0].w() + beta * v[1].z() / v[1].w() + gamma * v[2].z() / v[2].w();
z_interpolated *= w_reciprocal;
// z-buffering algorithm
auto index = get_super_index(x, y, k);
if (z_interpolated < super_depth_buf[index]) {
super_depth_buf[index] = z_interpolated;
super_frame_buf[index] = t.getColor();
depth_test = true;
}
if (depth_test) {
set_pixel(Vector3f(x, y, 0), get_super_color(x, y));
}
}
}
}
最终效果: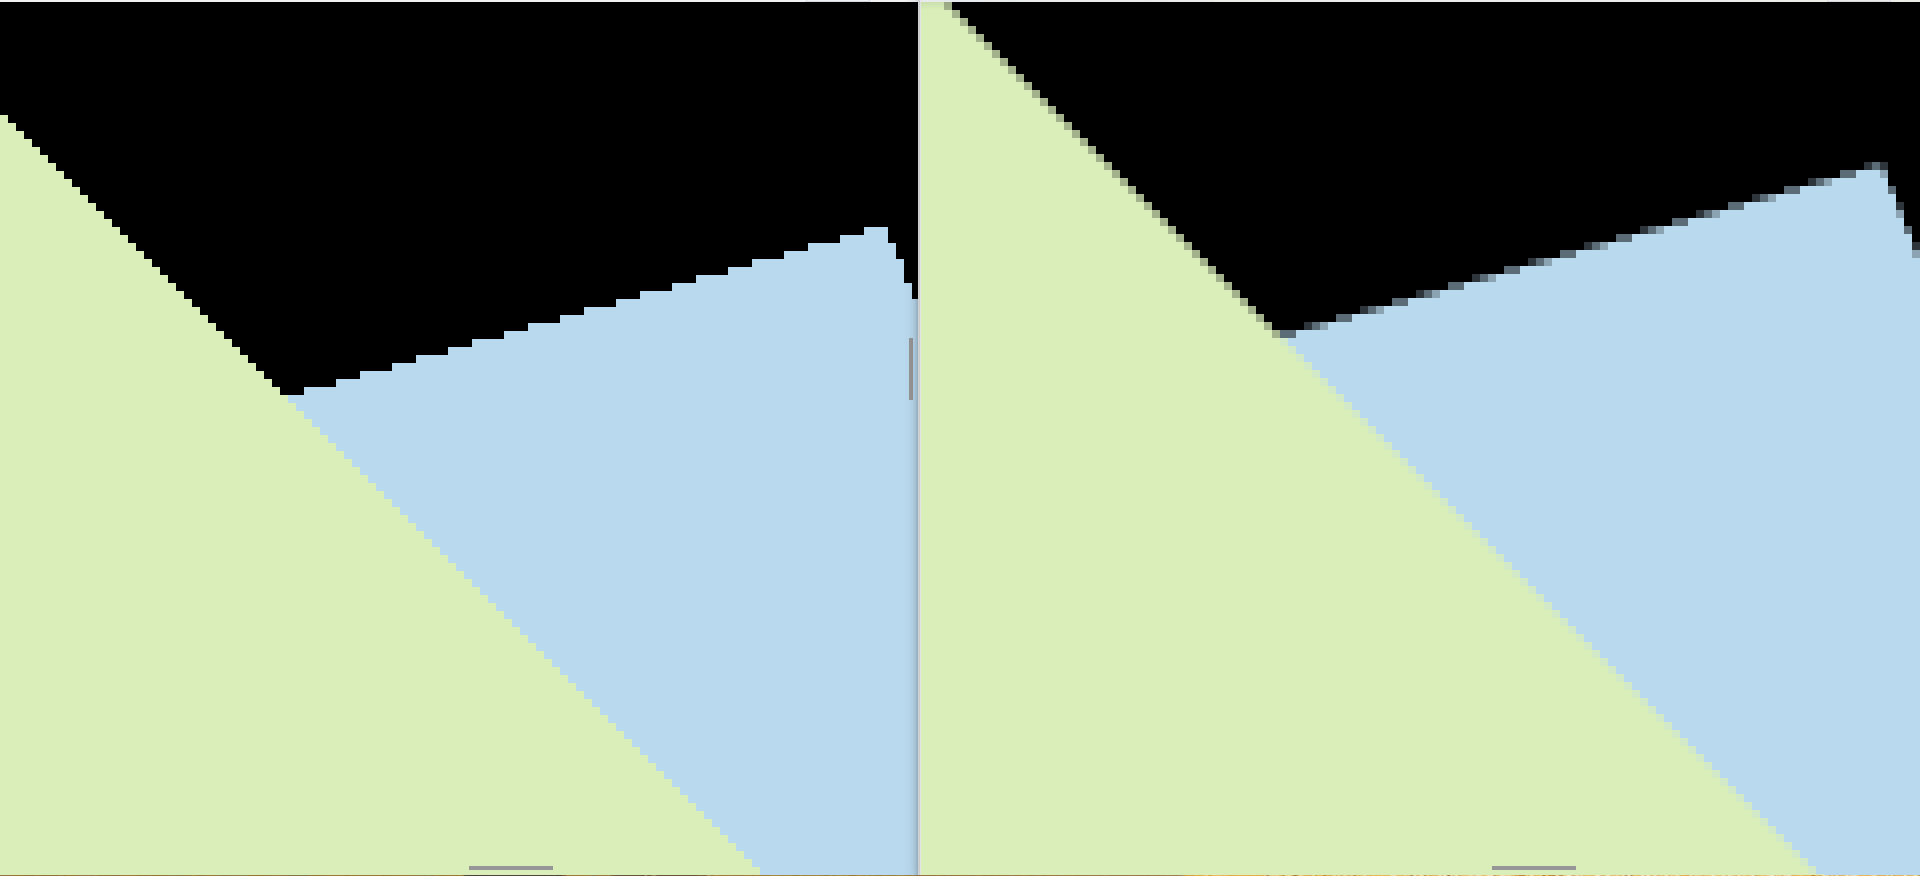
源码仓库:https://github.com/00nico00/GAMES101-Homework-record/tree/main/Assignment2
参考文章:
https://zhuanlan.zhihu.com/p/454001952
https://zhuanlan.zhihu.com/p/598823667 (解决黑边)
https://www.freesion.com/article/4973968295/ (三角形反了)
https://blog.csdn.net/weixin_51928794/article/details/117256226 (黑边问题剖析)